Is your Delta kitchen faucet dripping or not providing a steady flow of water? You’re not alone. Many homeowners face this common issue, and it often points to a worn-out cartridge. Instead of calling a plumber, you can tackle this simple repair yourself.
Key Takeaways
- Identify the Problem: A dripping or inconsistent flow in a Delta kitchen faucet often indicates a worn-out cartridge, which can be replaced easily by homeowners.
- Essential Tools: Gather necessary tools such as an adjustable wrench, screwdrivers, pliers, plumber’s grease, towels, and a bucket to simplify the replacement process.
- Step-by-Step Replacement: Follow a clear procedure: turn off the water supply, remove the faucet handle, extract the old cartridge, install the new one, and reassemble the faucet.
- Troubleshooting Techniques: After replacement, address common problems like persistent dripping or inconsistent flow by checking cartridge installation, cleaning the aerator, or lubricating the handle.
- Regular Maintenance: Conduct periodic inspections for leaks, clean the aerator regularly, and replace worn components promptly to ensure optimal faucet performance.
- Use Gentle Cleaners: Opt for mild soap and water when cleaning to avoid damaging the faucet’s finish and internal parts.
Tools Needed
You’ll need specific tools to replace the cartridge in your Delta kitchen faucet. Gathering these tools in advance simplifies the process.
- Adjustable Wrench: Use it to loosen and tighten nuts securely.
- Screwdriver: A flathead and Phillips screwdriver assist in removing screws and parts.
- Pliers: These help grip and pull hard-to-reach components.
- Plumber’s Grease: Apply this to lubricate O-rings and ensure a smooth installation.
- Towels: Keep towels handy to wipe spills and keep the area dry.
- Bucket: Place a bucket under the sink to catch any water that may drip during the replacement.
These tools assist in ensuring a smooth cartridge replacement process, minimizing frustration and mess.
Recommended Products

✔ Exact Replacement - Specifically engineered Replacement for Delta Monitor 1300 & 1400 series single-handle tub/shower valves (Only fits pre-2007 models - incompatible with post-2007 MultiChoice Universal Valves)

1.5 gpm, 5.7 L/min

Compatible with Delta faucets For use with single-handle kitchen and lavatory faucets (not included)
Step-by-Step Process
Follow these steps to replace the cartridge in your Delta kitchen faucet smoothly.
Recommended Products
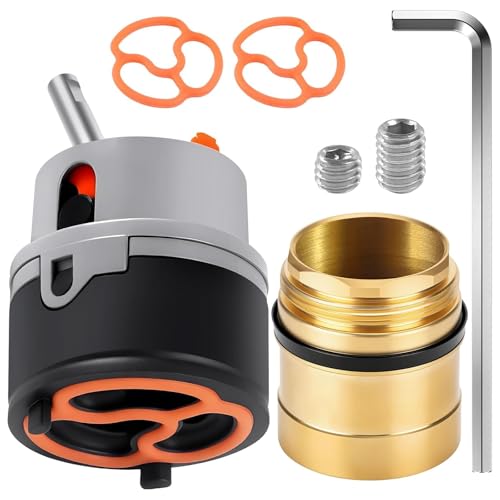
🚰 【Precise Fit for Delta DST Faucets】This RP50587 replacement cartridge is designed for compatibility with a wide range of Delta single-handle kitchen and bathroom faucets, including models 100, 101, 140, 400, 440, 441, and more. It serves as a direct replacement for the delta rp50587 cartridge valve, ensuring a perfect fit and reliable operation. ♥【NOTE: Packaged with 2 Seal Gaskets, one of it has been preinstalled.】

DIAMOND Seal Technology is less hassle to install and helps your faucet perform like new for life, reducing leak points and lasting twice as long as the industry standard

Perfect Compatibility: The RP50587 valve cartridge fits part DST single-handle kitchen and lavatory . (DST Faucet Model:100; 101; 140; 141; 400; 440; 441; 470; 501; 520; 522; 978; 1353; 1903; 4140; 4153; 4353; 4453; 9178; 9678; 9978; 16968; 16970; 19888;19950Z)
Turn Off Water Supply
Locate the water supply valves under the sink. Turn them clockwise to shut off the water. If you can’t find the valves, turn off the main water supply for your home.
Remove Faucet Handle
Use a screwdriver to remove any screws on top or behind the handle. Lift the handle straight up off the faucet when screws are removed. If your model has a decorative cap, pry it off gently before unscrewing.
Take Out Old Cartridge
Once the handle is off, look for the retaining clip securing the cartridge. Remove this clip with pliers. Pull the old cartridge straight out of the faucet body. If it’s stuck, wiggle it gently while pulling.
Install New Cartridge
Insert the new cartridge into the faucet, ensuring it sits correctly in the socket. Secure it with the retaining clip. Make sure it’s snug but don’t over-tighten, as that may damage the cartridge.
Reassemble Faucet
Replace the handle back onto the faucet. Secure it with screws and, if applicable, snap the decorative cap back in place. Turn on the water supply valves counterclockwise, checking for leaks. Test the faucet to ensure smooth operation.
Common Issues
When replacing the cartridge in a Delta kitchen faucet, you might encounter some common issues. Addressing these problems quickly helps restore proper function and prevent further damage.
Troubleshooting Tips
- Persistent Dripping: If the faucet still drips after changing the cartridge, check for proper installation. Ensure the cartridge is seated firmly and the retaining clip is secure. Also, inspect the O-rings for wear or damage.
- Inconsistent Water Flow: Fluctuating pressure might stem from debris lodged in the aerator. Remove the aerator and rinse it thoroughly. Reassemble once clean to improve water flow.
- Difficulty Operating Handle: If the handle feels stiff or unresponsive, it might require lubrication. Apply plumber’s grease to the handle’s stem for smooth operation.
- Regular Inspections: Periodically check your faucet for leaks or drips. Early detection minimizes water waste and repair costs.
- Clean Aerator Frequently: Clean the aerator every few months to prevent clogs. Unscrew it, soak in vinegar, then rinse under hot water before reattaching.
- Use Gentle Cleaning Solutions: When cleaning your faucet, opt for mild soap and water. Avoid abrasive cleaners that can damage the finish and components.
- Replace Worn Parts Promptly: If you notice any signs of wear like frayed O-rings or cracks in the cartridge, replace them right away to maintain optimal performance.
Address these common issues effectively, ensuring your Delta kitchen faucet functions smoothly for years to come.
Conclusion
Replacing the cartridge in your Delta kitchen faucet can be a straightforward task that saves you time and money. With the right tools and a little patience you can tackle this project confidently.
By following the steps outlined you’ll not only fix common issues like dripping and inconsistent flow but also extend the life of your faucet. Remember to perform regular maintenance and inspections to keep everything running smoothly.
Enjoy the satisfaction of a job well done and the peace of mind that comes with a fully functional faucet. Happy DIYing!
Frequently Asked Questions
What causes dripping in Delta kitchen faucets?
Dripping in Delta kitchen faucets is often caused by a worn-out cartridge. Over time, the seals inside the cartridge can deteriorate, leading to leaks.
How can I replace the cartridge in my Delta faucet?
To replace the cartridge, first, turn off the water supply. Remove the faucet handle, take out the old cartridge, and install the new one. Finally, reassemble the faucet and turn the water supply back on.
What tools do I need for cartridge replacement?
You will need an adjustable wrench, screwdrivers, pliers, plumber’s grease, towels, and a bucket. These tools will help you complete the cartridge replacement efficiently.
What should I do if my faucet still drips after replacing the cartridge?
If your faucet continues to drip, check the installation of the new cartridge and ensure it’s secure. Clean the aerator and inspect the handle for lubrication.
How can I maintain my Delta kitchen faucet?
Regularly inspect the faucet for wear, clean the aerator, and use gentle cleaning solutions. Promptly replace worn parts to maintain optimal performance and prevent issues.